As of Big Sur, applications can provide their own accent color for things like default buttons, focus rings, selection indicators, checkboxes, radio buttons, and so on. I personally really like this, as it allows Mac apps to have just a little more personality. Unfortunately, Xojo does not have a built-in option for this and most likely never will. This isn't because Xojo doesn't want there to be, but because doing so requires reverse engineering Apple's compiled asset catalog format.
In this guide, I'll teach you how to set this up by first creating an asset catalog in Xcode, compiling that catalog, and utilizing it in your macOS app. I'll cover everything you need to know, step by step, even if you've never used Xcode, the command line, or any of Xojo's automation tools. This guide assumes Xcode is already installed however.
A brief introduction to asset catalogs
Developing apps for Apple devices these days typically includes something called an asset catalog. It can store color sets and image sets, similar to Xojo's ColorGroup and ImageSet classes. These catalogs can be manipulated by Apple during distribution. For example, downloading an iOS app on an iPhone Pro Max will automatically strip away the 1x and 2x resolutions of images that have a 3x resolution. By doing so, they allow Apple's app stores to deliver more optimized downloads.
The good news is that asset catalogs are pretty simple. They are just folders full of images and json files. Xcode has an editor for them that you absolutely should use. The bad news is that the asset catalogs cannot be used as-is and require being compiled into a "car" file first. This is done with the actool command line tool, which is included with Xcode. For Xojo to allow custom accent colors, they would need to replicate this process. This is why the feature will likely never come to Xojo.
Creating your asset catalog
Launch Xcode, and from the File menu choose "New -> File…" or just press ⌘N. From the template chooser, find "Asset Catalog" under the "Resource" header. The filter field helps with this. You will immediately need to save this folder somewhere. I recommend keeping it near your project of course.
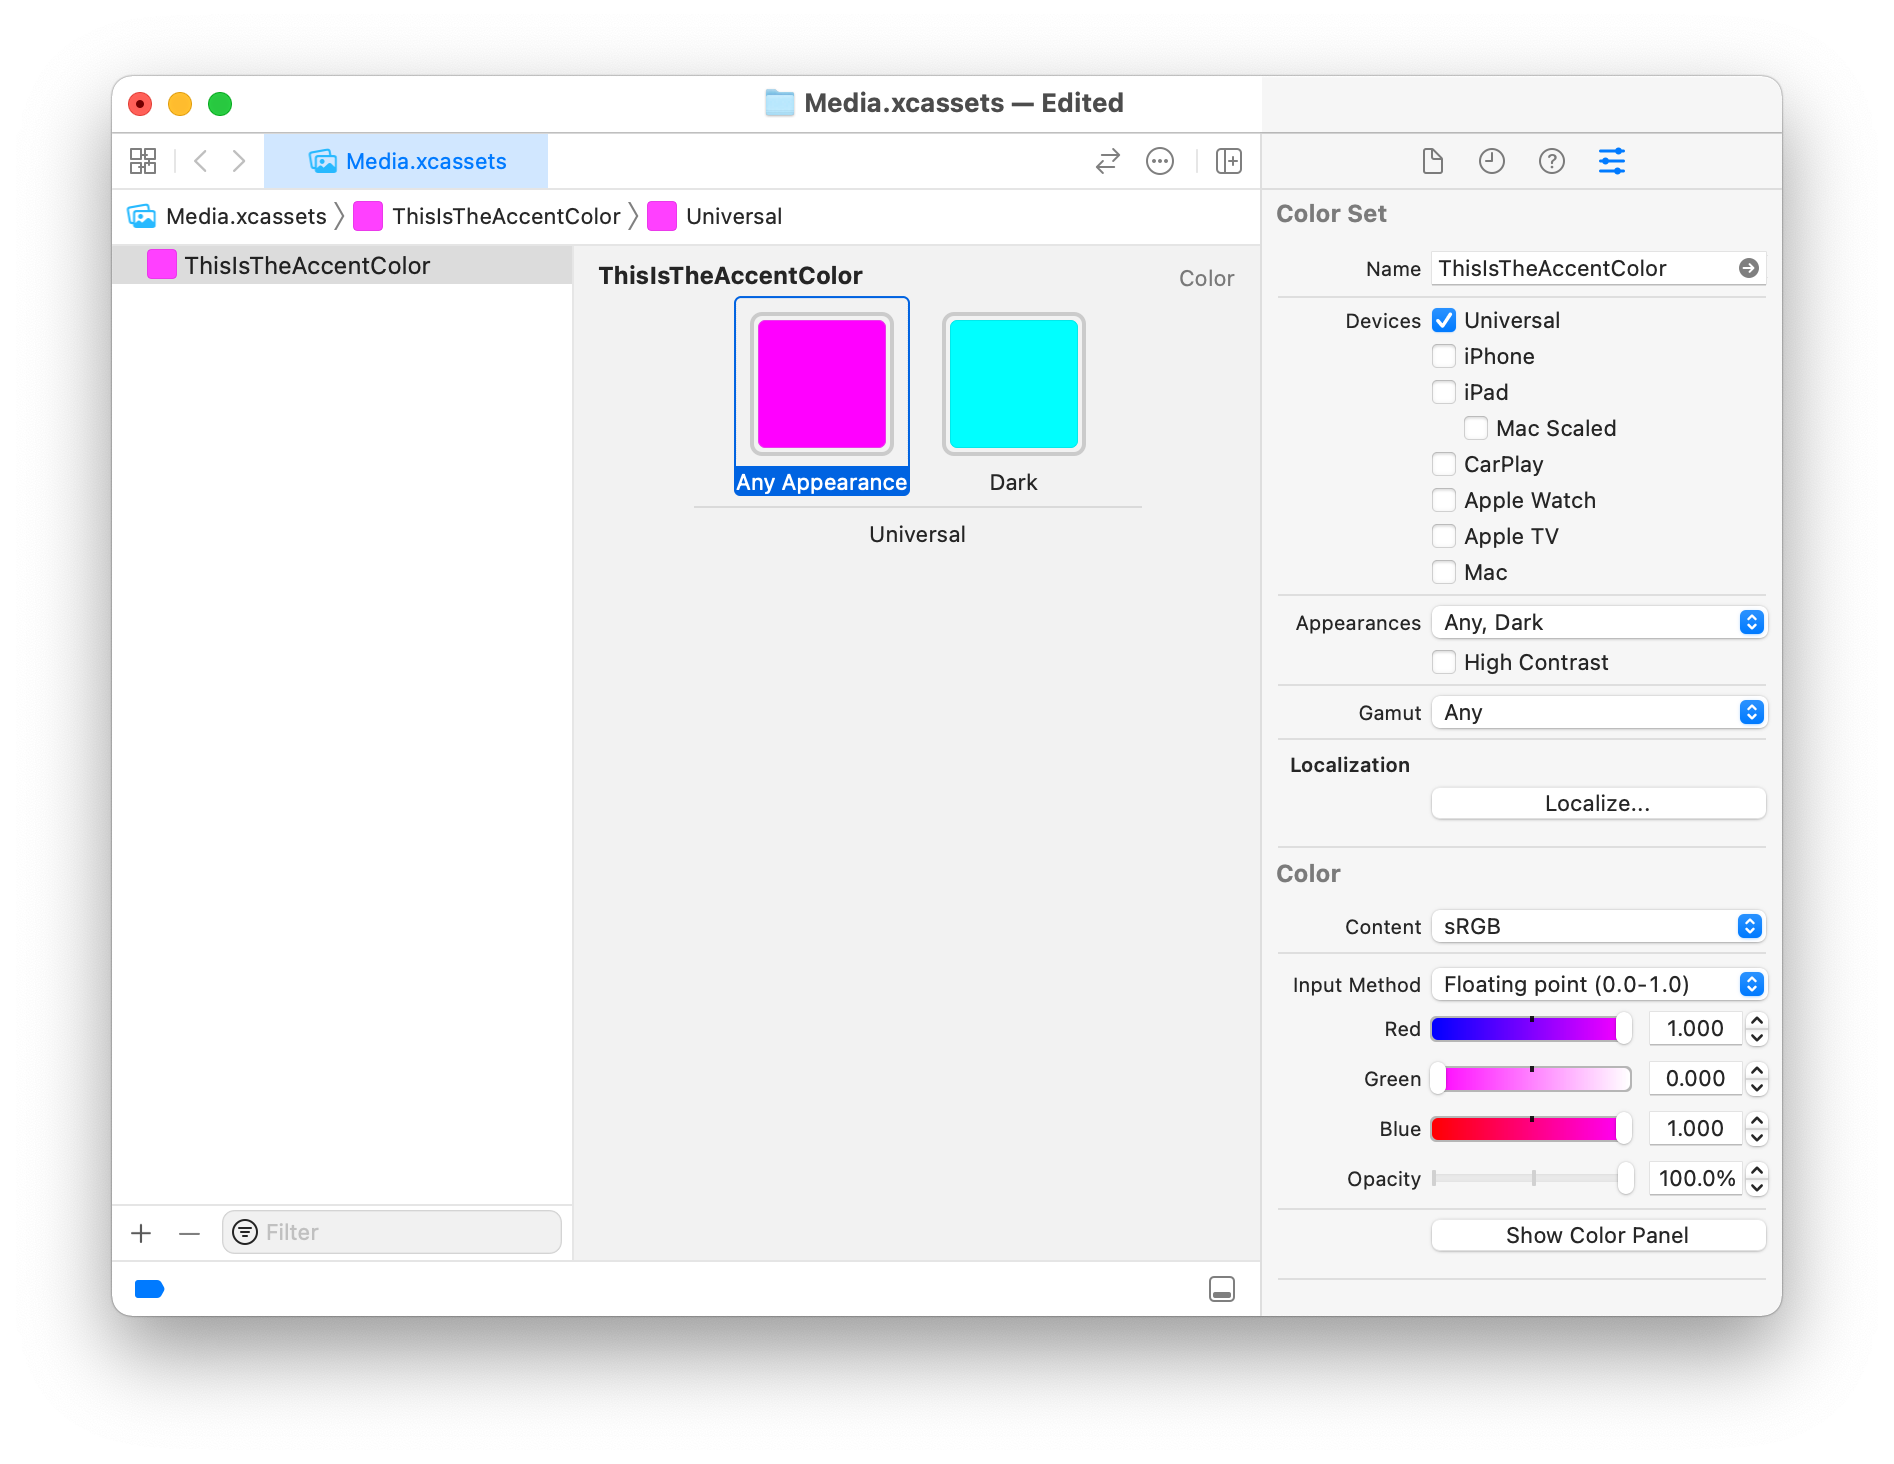
Now you have an empty asset catalog. At the bottom of the left column, use the plus button to choose "Color Set." A new row will be created ready for you to name it. I called mine ThisIsTheAccentColor. In the larger content area, you will have two white squares for "Any Appearance" and "Dark" with no obvious way to set the colors. From the View menu, choose "Inspectors -> Attributes" or ⌥⌘4. In the newly-opened attributes inspector you'll see an Appearances menu on the right. The default of "Any, Dark" is what I recommend because nearly every color needs some sort of adjustment for dark mode, even branding colors. In this context, "Any" means anything that is not dark mode. That would include light mode, and any future modes that Apple may or may not introduce. You can choose "Any, Light, Dark" instead, to supply an explicit light mode code, but considering we don't know what other options might be added, there's little purpose in doing so.
Clicking one of the squares adds the "Color" section to the attributes inspector, which will default to sRGB content. That's good. Use the options to set your color. Repeat as necessary for each square to complete the color set.
At this point, you're done with the asset catalog itself, though there are some more neat things that can be done with it in the future. The asset catalog is how you would activate Big Sur's system-generated document icons, for example. But for now, we've done everything we need to.
Creating an Info.plist file
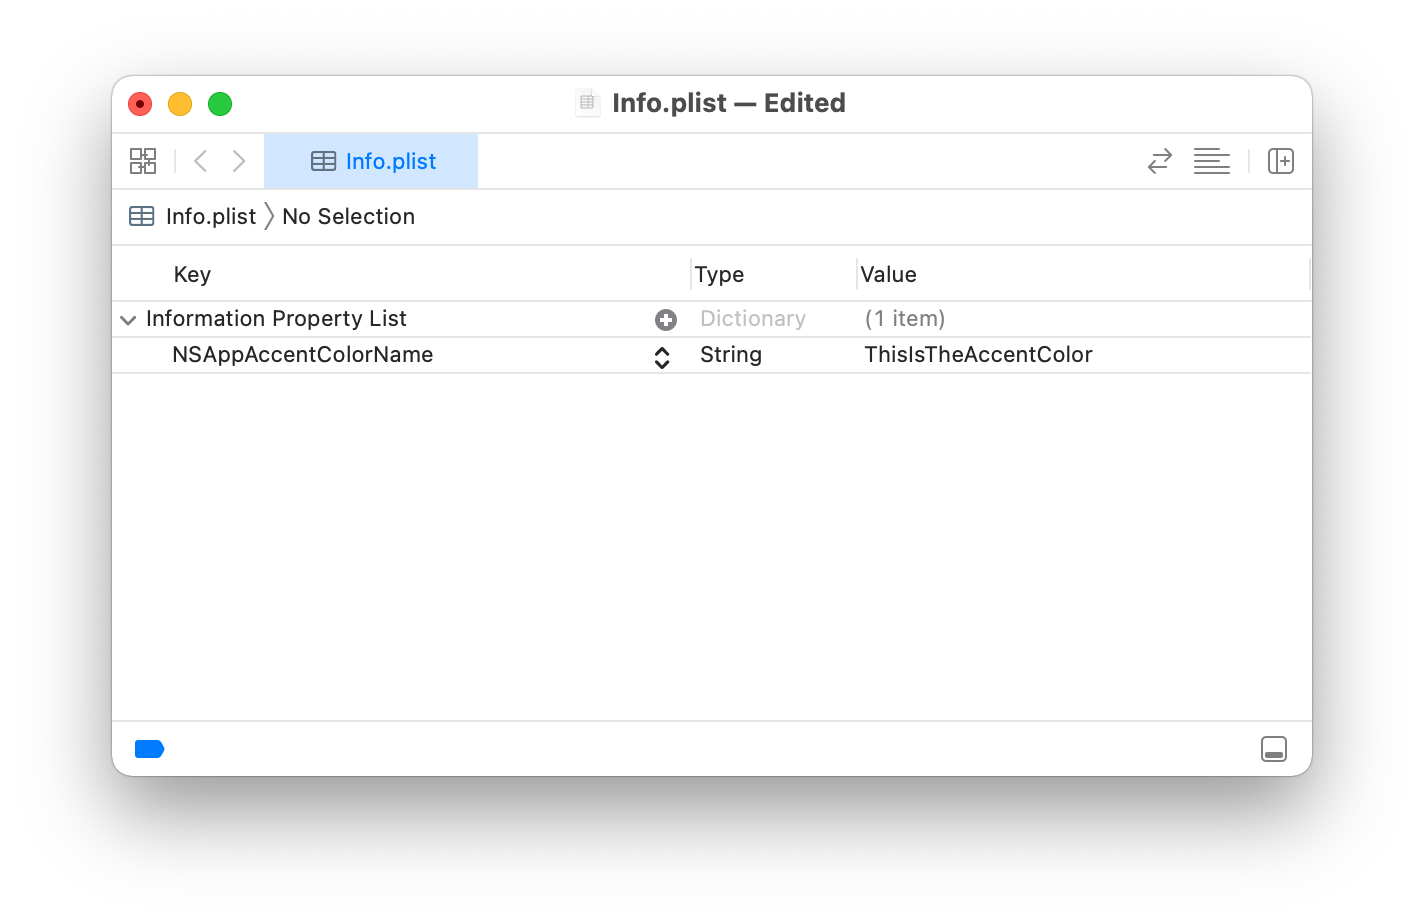
Every app for every Apple device has an Info.plist file inside of it. Xojo will generate it for you, but you need to add a new value to it that Xojo does not support. If you already know how to do this, you need to add NSAppAccentColorName as a string set to the name of your color set. Mine will be set to ThisIsTheAccentColor. Skip to the next section if you're comfortable doing this, or read on if you're not.
Still in Xcode, you need another new file. Again, choose "New -> File…" from the File menu. This time in the template chooser, you need to select "Property List" from the "Resource" header. Like before, you need to save it immediately, however this time it must be named Info.plist. Save it near your project like you did the asset catalog. In the first row below the header, you'll see "Information Property List." Hover your cursor in that row along the right edge of the column until a plus button appears. Tap it once, and a menu of choices will appear. For some reason, the one we need is not in this menu. So instead, type NSAppAccentColorName. In the "Type" column, make sure the type is "String." If it isn't, clicking the type will open a menu allowing you to change it. Lastly, in the "Value" column enter the name of your color set from the asset catalog. Remember I named mine ThisIsTheAccentColor so that's what I'll enter here. Save your Info.plist and you can exit Xcode if you like.
Compiling your asset catalog
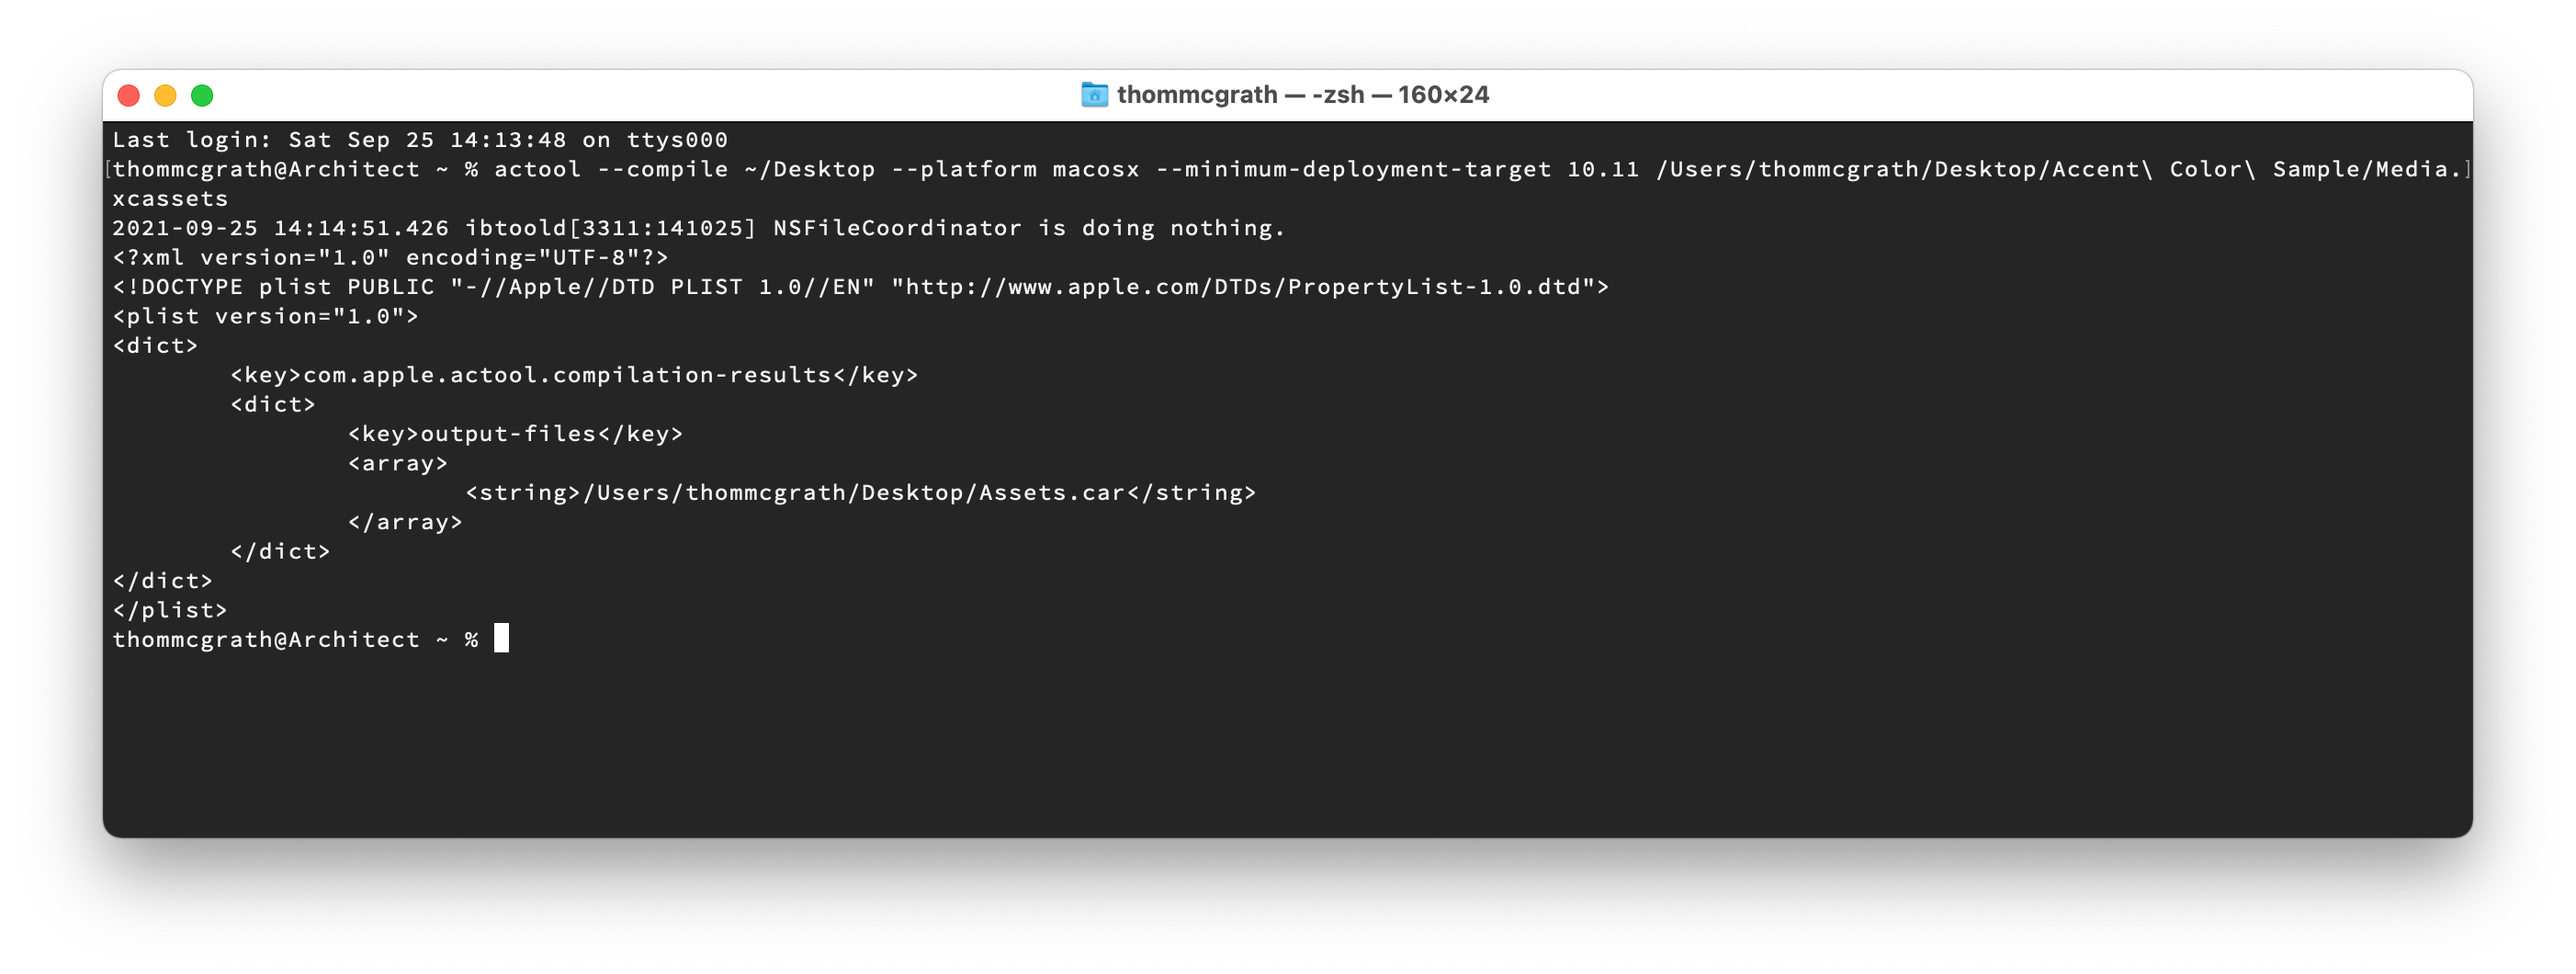
Next up, we'll need to compile the asset catalog. This is done using the command line. I'll walk you through it as best as I can assuming you have no experience with it. Launch Terminal and type actool --compile ~/Desktop --platform macosx --minimum-deployment-target 10.11, but do not press return. Make sure what was typed ends in a single space, because web browsers tend to trim it off the end. Next find your asset catalog and drag it into your Terminal window. This will add the full path to the end of the command and will look something like actool --compile ~/Desktop --platform macosx --minimum-deployment-target 10.11 /Users/thommcgrath/Desktop/Accent\ Color\ Sample/Media.xcassets. Press return to begin the work, which will take a couple seconds. When it completes, you'll see some XML output. It will have put an Assets.car folder on your desktop. Move this near your project, but do not rename it. You're done with Terminal.
For those more experience with the command line, you can of course change the destination using the --compile parameter.
Adding the files to your Xojo project
If you already know how to use build automation, you'll need to have your Assets.car file added to your app's resources folder. If you don't know how to use build automation, follow the steps in the next paragraph.
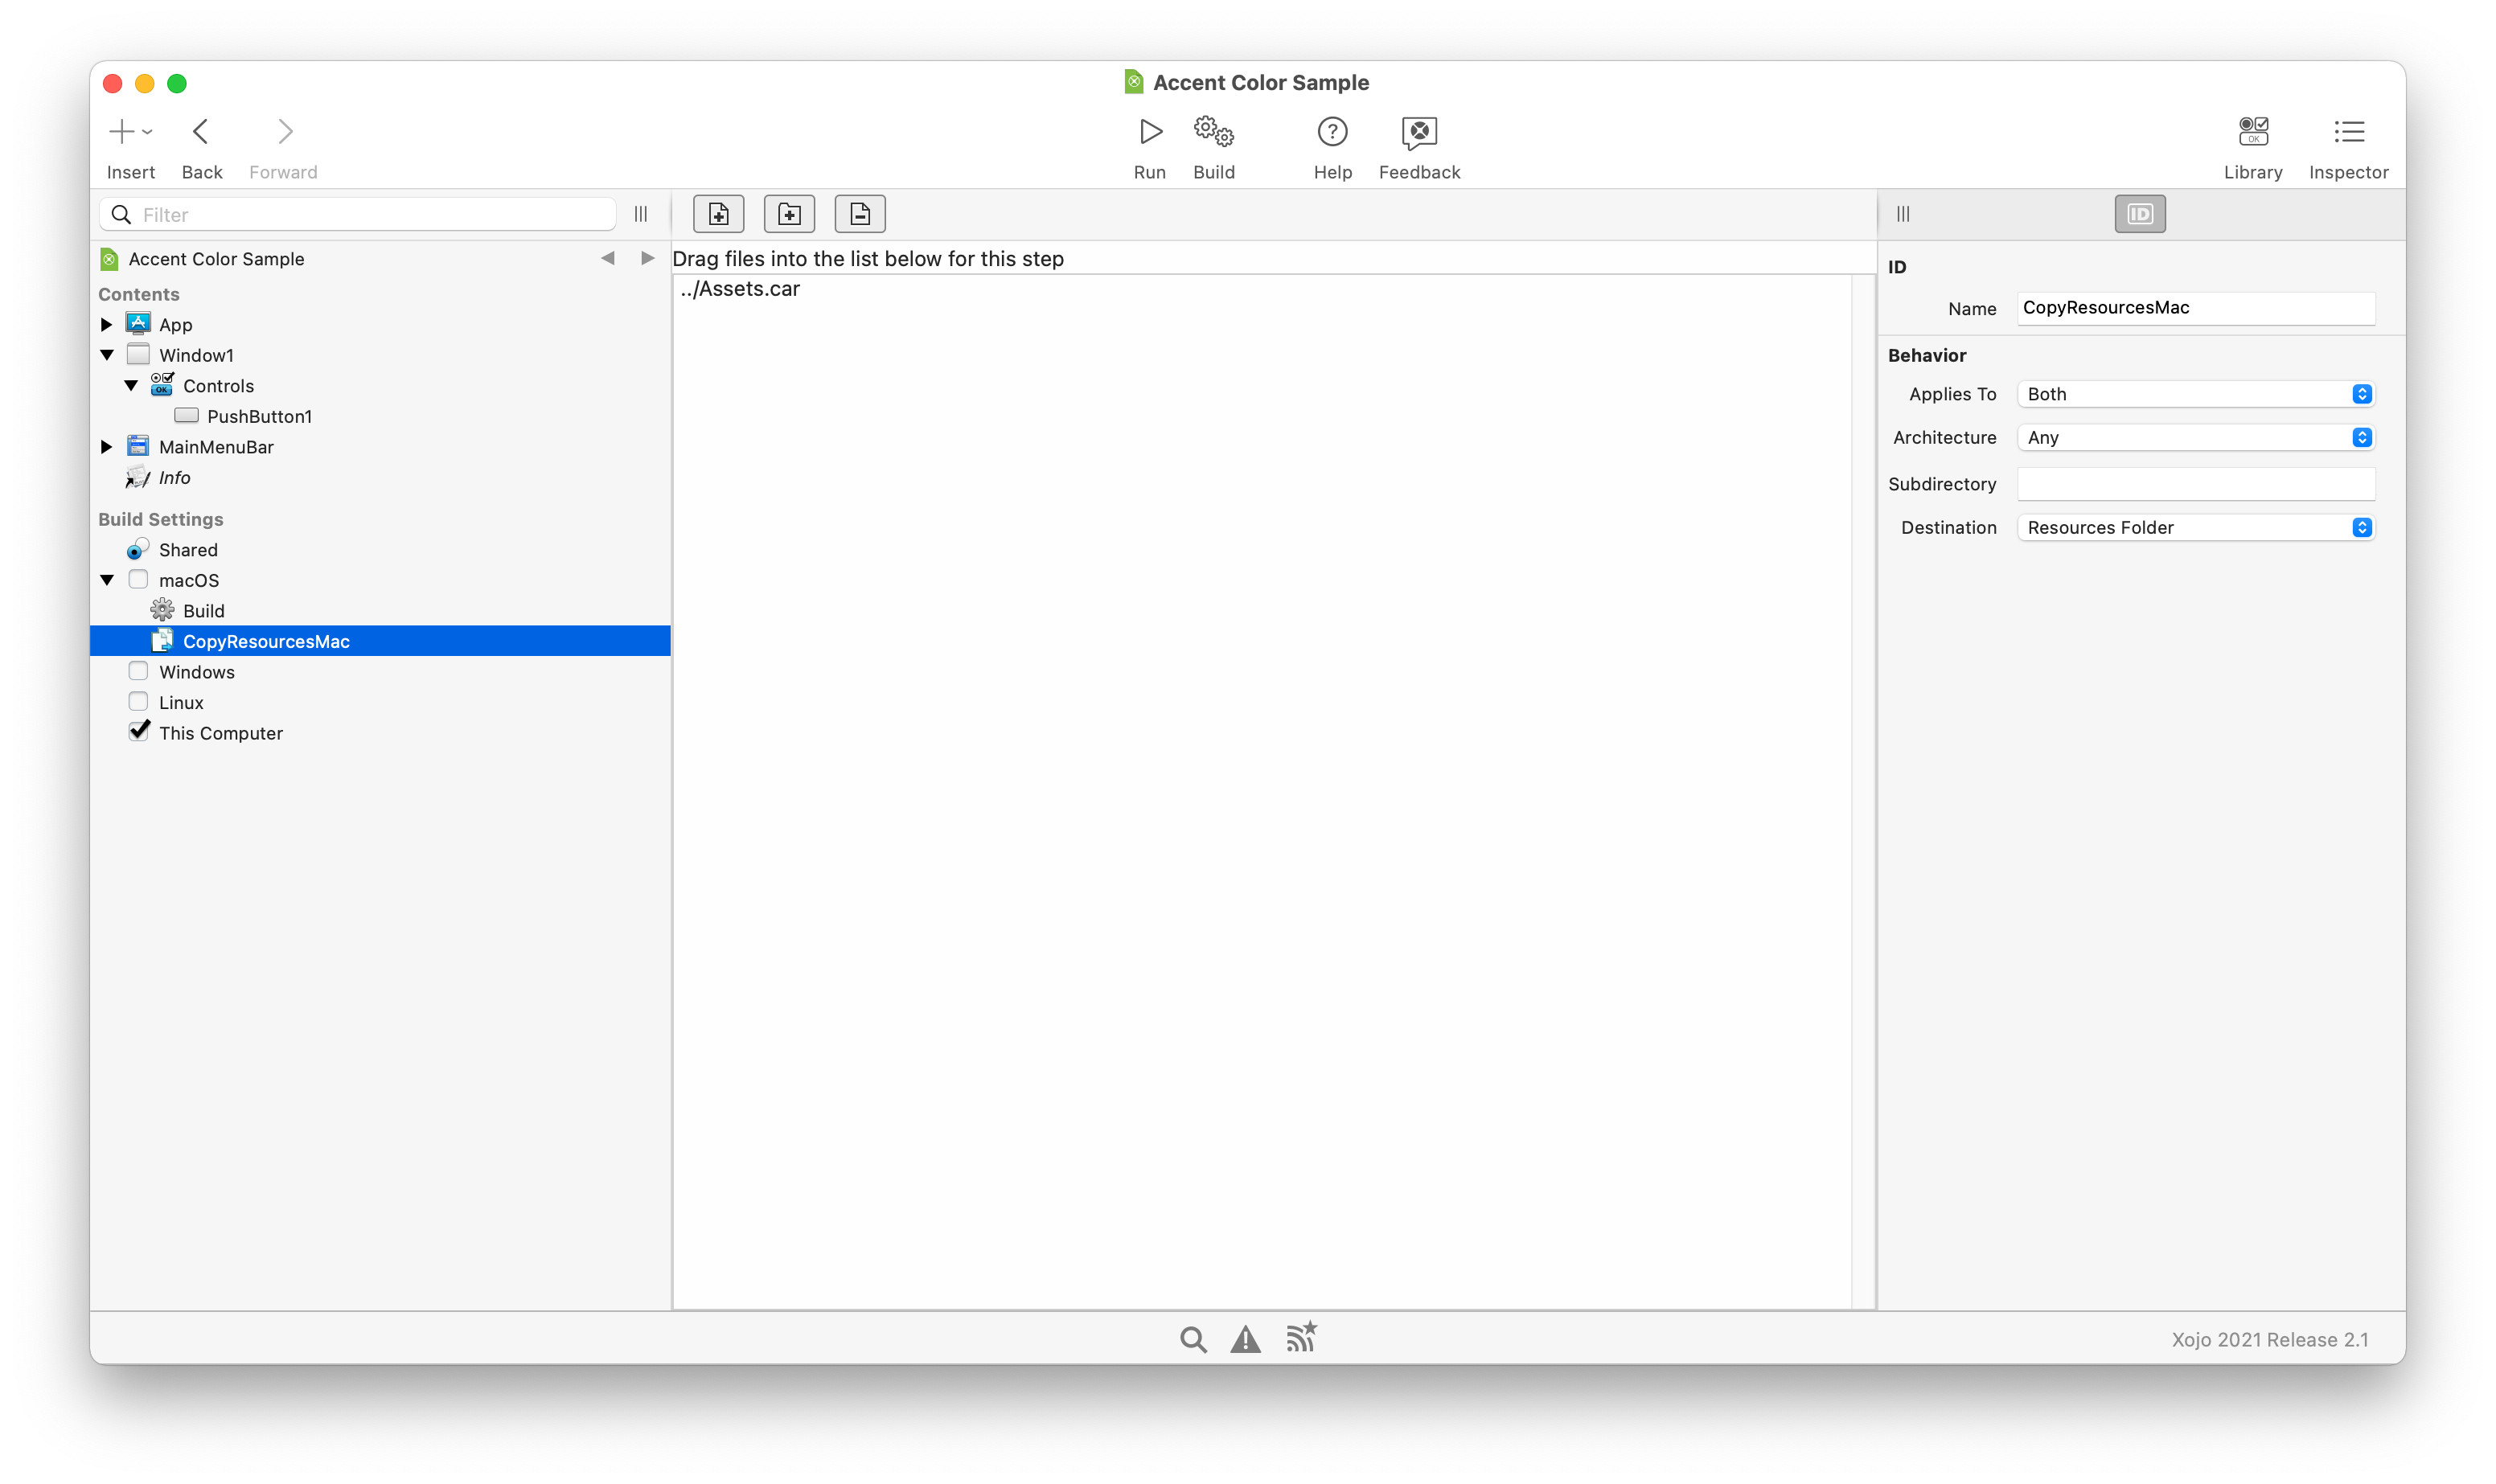
In your Xojo project, use the Insert menu to choose "Build Step -> Copy Files." Name this object as descriptive as possible. Something like CopyResourcesMac would be good, in case you need one for Windows and Linux in the future. In the inspector, set the Destination to "Resources Folder" and then drag your Assets.car file into the middle list. Then drag this build step into the "macOS" checkbox below "Build Settings" in Xojo's navigator. The navigator will gain a "Build" item as a child of "macOS" and your build step will be listed just before it. You need to move your build step after that "Build" item. Most build steps should be triggered after the build itself, but some can be placed before it if the step were to change the project prior to building.
Finally, add your Info.plist file to your project. Just drag it right into the navigator. Xojo will include its keys during the build process.
Test it out
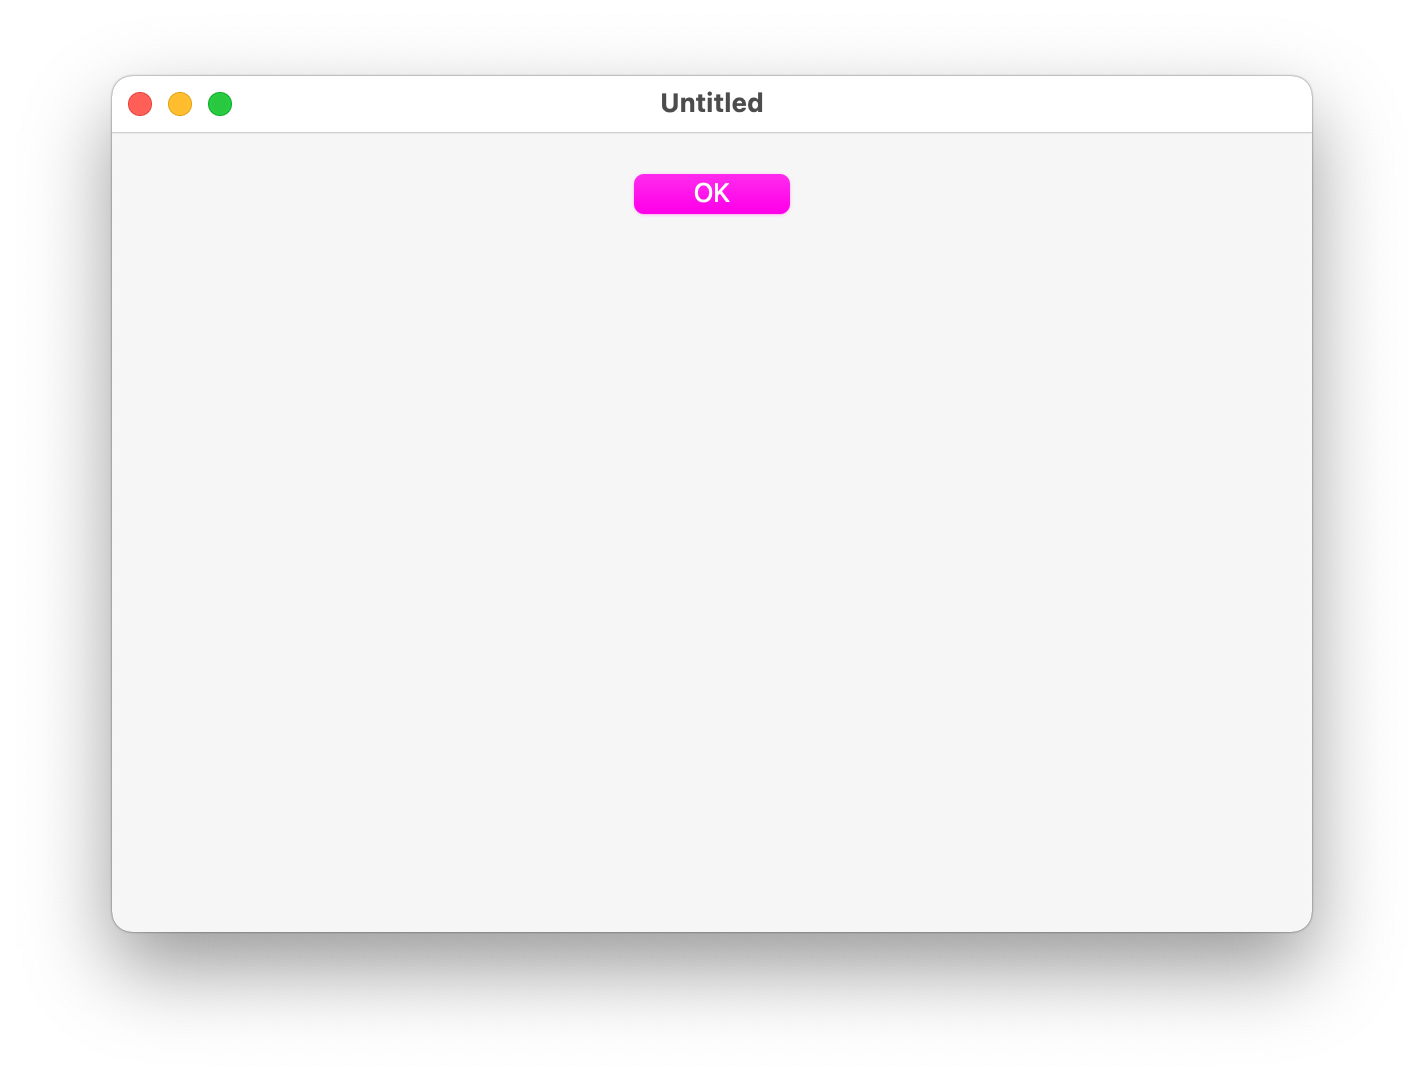
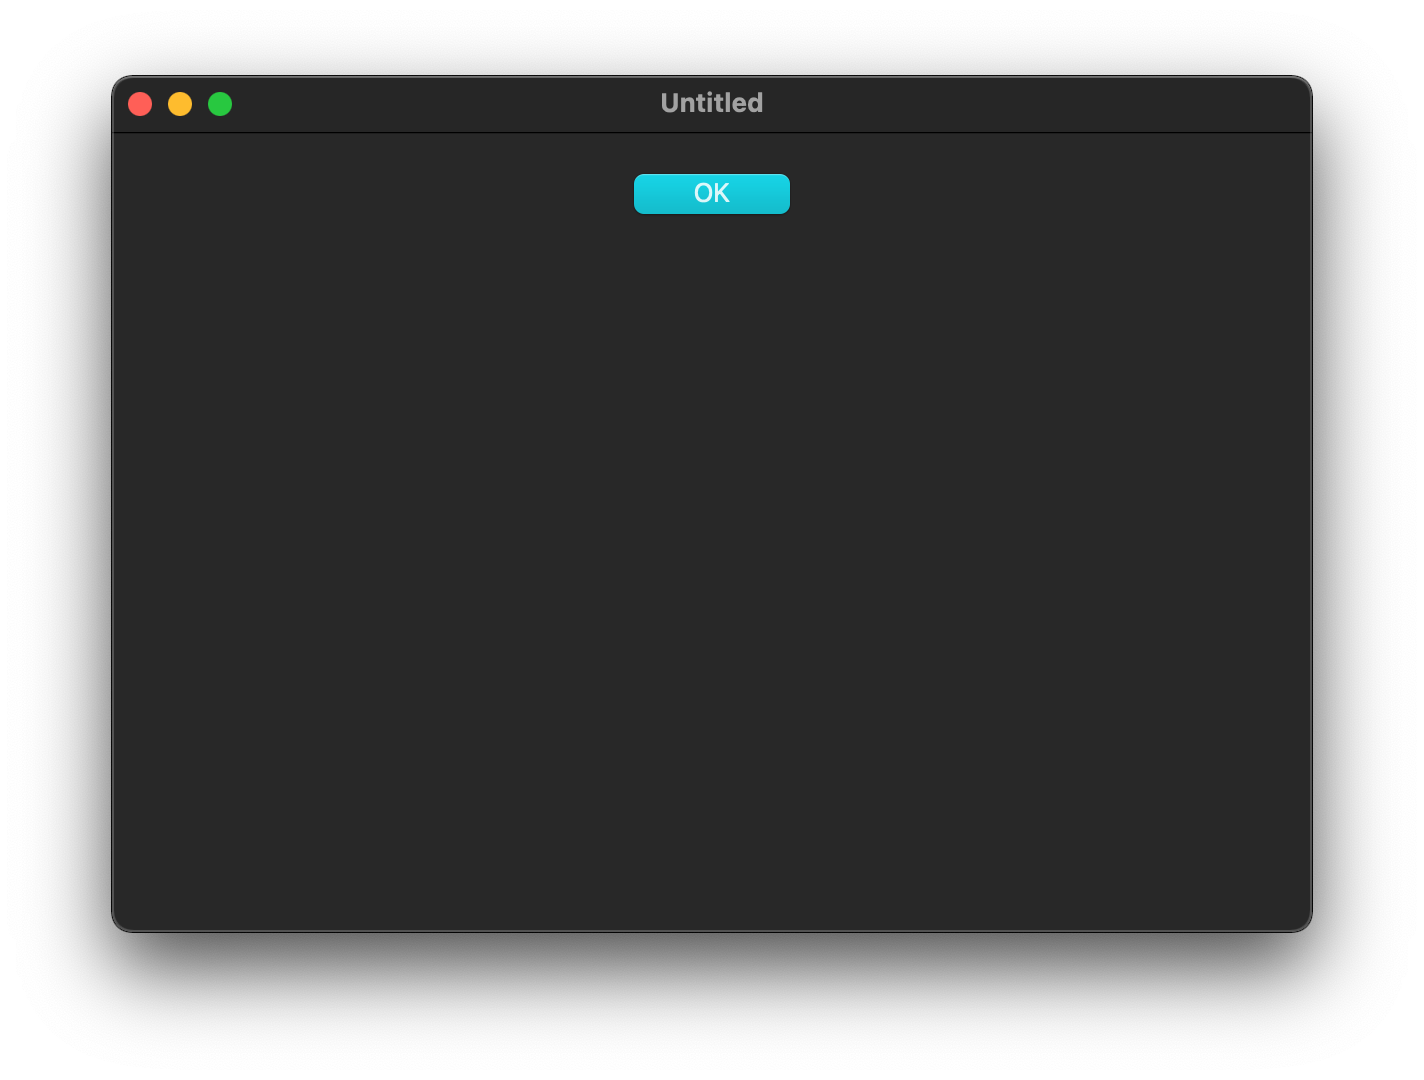
That's it, you're done. Run your application and your buttons will have the new color. If they do not, check your System Preferences. Under General, make sure the accent color is set to "Multicolor" so that apps may pick their own. The colors should immediately change in your app.
And here's some screenshots of the hideous colors I chose:
 |
| AccentColorSample.zip ( 9.6 KB ) |
Gallery


